Showing posts with label DIY. Show all posts
Friday, 17 February 2012
Tuesday, 31 January 2012
DIY Inspiration
I was browsing through Forever 21's website and came across these cool pieces. Although they are inexpensive like everything else at Forever 21, I know I can DIY them and customize the colors to my liking. Can't wait to find time to recreate some of them :)


Wednesday, 4 January 2012
Party time
Here's what I would have worn on NYE if I had gone out. Instead I opted to stay at home and plant myself on the couch. My sister and I made some yummy appetizers (a few pics here) and we spent the night watching the US/CAN hockey game (CANADA WON btw!) but unfortunately we lost last night's semi final :(
P.S. Slowly working on some changes to the blog so stay tuned!
This dress has a nice subtle sheen to it, see photos below.
DIY bracelet and glittery nails.
I love this bright orchid nail polish, a new purchase with my gift voucher from here.
I love this school boy blazer especially the buttons!
My best find from 2011, read more about it here.
{Dress- Jack by BB Dakota}
{Blazer- Aritzia}
{Bracelets- DIY}
{Shoes- Vintage YSL}
{Nails- Deborah Lippmann Flash Dance}
I still have about a week before I go back to work (school's still out), but I'm looking forward to all the new and exciting things that will happen this year! I also want to thank all of you for your thoughtful comments. I read every single one and truly appreciate it! Remember if you love my blog then please follow on Google Connect Friends or Bloglovin :)
How did you spend NYE? And what did you wear?
Loving Low Key New Year's Lately,
Amy
P.S. Slowly working on some changes to the blog so stay tuned!
Tuesday, 20 December 2011
DIY:Kusudama Flower Ornament
Still looking for a Christmas gift? Well here's a homemade gift everyone will love, Kusudama Flower Ornaments.
Kusudama is a Japanese paper ball made of identical units glued or sewn together. The name translates to medicine ball as they were originally filled with incense or potpourri, but now are used as decorations. There are many different versions but this flower ball is one of the simplest to make :)
TIP: I use these spiral notepads from the Dollar Store!
- white glue
- string/ribbon
- bead or charm
First make 12 flowers following the instructions here. It may take a little time but the end product is worth it! The flowers look great on their own, so if you don't want to make an ornament you could just fill a glass bowl with a couple of flowers. For the red and green version I made 6 red and 6 green flowers. Then I attached following the instructions here (it also explains how to attach the string and charm). I made it so that the green flowers are on the top and bottom sandwiching the red flowers in the middle.
Loving Kusudama Flower Ornaments Lately,
Amy
Kusudama is a Japanese paper ball made of identical units glued or sewn together. The name translates to medicine ball as they were originally filled with incense or potpourri, but now are used as decorations. There are many different versions but this flower ball is one of the simplest to make :)
Materials:
- 60 pieces of square paper (the bigger the paper, the bigger the ornament)TIP: I use these spiral notepads from the Dollar Store!
- white glue
- string/ribbon
- bead or charm
First make 12 flowers following the instructions here. It may take a little time but the end product is worth it! The flowers look great on their own, so if you don't want to make an ornament you could just fill a glass bowl with a couple of flowers. For the red and green version I made 6 red and 6 green flowers. Then I attached following the instructions here (it also explains how to attach the string and charm). I made it so that the green flowers are on the top and bottom sandwiching the red flowers in the middle.
I really love this color combo as the flowers remind me of poinsettias :)
These ornaments make great gifts even when it's not Christmas so go grab some paper and get crafty!Loving Kusudama Flower Ornaments Lately,
Amy
Thursday, 8 December 2011
t+j designs Style Challenge: Holiday Outfit
So at the last minute I have decided to enter the t+j designs style challenge. I wanted to restyle this statement necklace for the holidays as I almost always wear it with a LBD for parties.
*I apologize in advance for the quality and size of the photos, if I had more time I would have used a better camera and edited them.
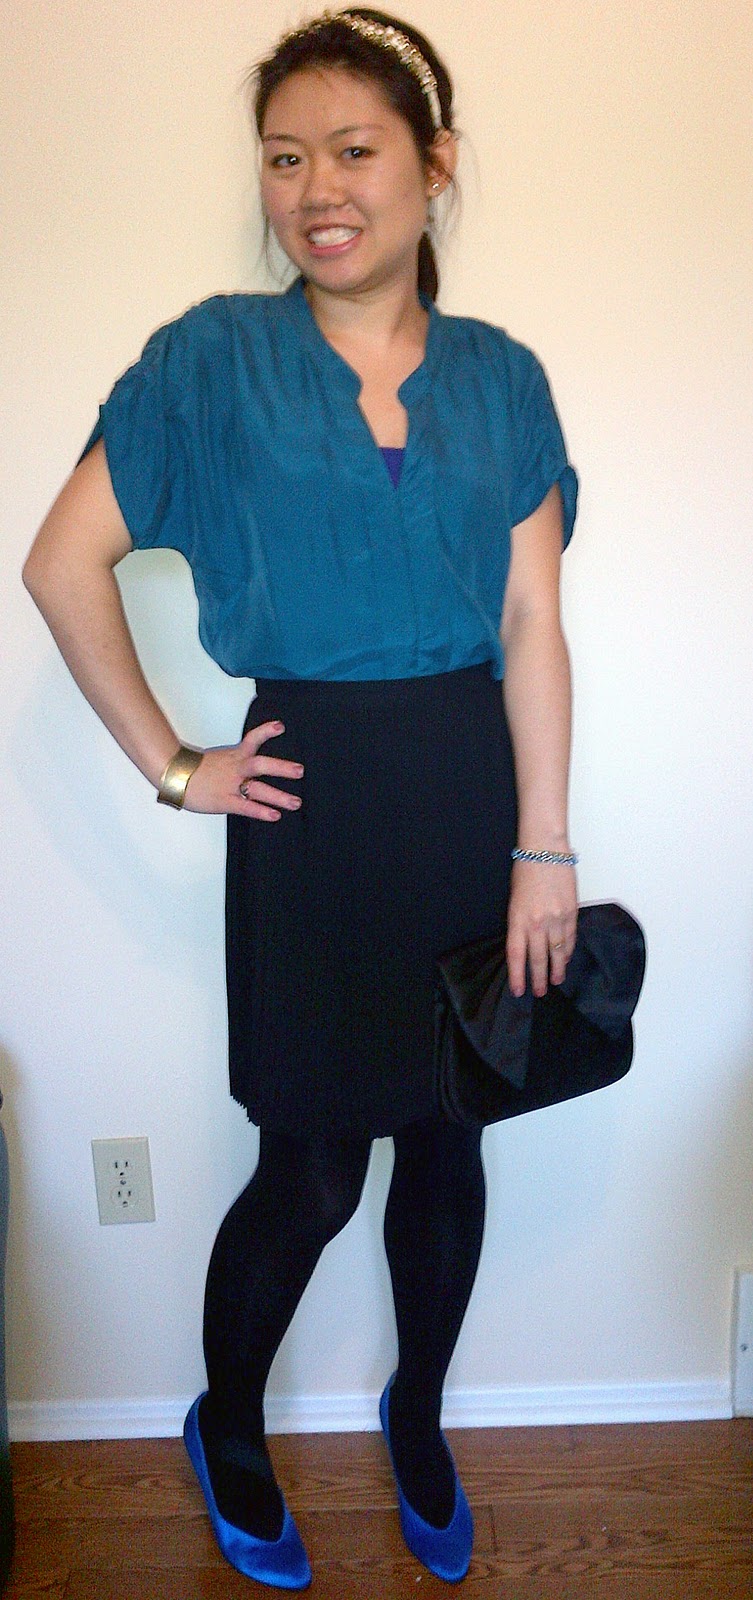
Firstly I wanted to incorporate color because as mentioned above, LBDs are my go to party outfits. I chose this teal silk blouse as jewel tones are perfect for the holidays. I paired it with a pleated (hard to tell in photo) black skirt to balance it out and added the electric blue pumps for an extra pop of color.
To change up the necklace I turned it into a headband as my black hair is the perfect canvas. Initially I tried to use it as is, but since it's layered it wouldn't sit flat against my head. Instead, I wrapped the necklace around a thin white headband which turned out even better! I love how it looks like beads are intertwined with the chains.
To keep the focus up near my face I decided against a necklace and wore simple pearl studs. I added some simple bracelets and rings (sorry I forgot to take a close up them). To balance things out I kept the chunkier bracelet and ring on one hand, and thinner ones on the opposite. Here's a look at all the jewelry minus the studs. I used different shades of gold to mix things up.
I love the overall look, it's perfect for the holidays. Can't wait to wear this to some parties in the next few weeks:)
Loving the t+j designs style challenge,
Amy
*I apologize in advance for the quality and size of the photos, if I had more time I would have used a better camera and edited them.
Here's what I came up with...
Silk Blouse: Banana Republic, Pleated Skirt: Moon, Heels: Vintage YSL,
Bag: Vintage, Headband: Aldo necklace (shown in first pic above)
Bracelets: Van Heusen and DIY, Rings: Aldo and Gifted, Earrings: Forever 21
To change up the necklace I turned it into a headband as my black hair is the perfect canvas. Initially I tried to use it as is, but since it's layered it wouldn't sit flat against my head. Instead, I wrapped the necklace around a thin white headband which turned out even better! I love how it looks like beads are intertwined with the chains.
![]() |
| Man I have a lot of flyaways! |
To keep the focus up near my face I decided against a necklace and wore simple pearl studs. I added some simple bracelets and rings (sorry I forgot to take a close up them). To balance things out I kept the chunkier bracelet and ring on one hand, and thinner ones on the opposite. Here's a look at all the jewelry minus the studs. I used different shades of gold to mix things up.
I love the overall look, it's perfect for the holidays. Can't wait to wear this to some parties in the next few weeks:)
Loving the t+j designs style challenge,
Amy

Saturday, 19 November 2011
DIY Knotted Satin Cord Friendship Bracelet
I remember that as a kid I was really into arts and crafts- paper mache, origmai, friendship bracelets etc. However as school got busier I soon abandoned this hobby. My year of no shopping helped me love this hobby again :) During the summer my sister and I became addicted to jewellery diys and I now have quite the collection of bracelets (plus a tupperware container full of more material waiting to be used!). I thought I'd share you how to make these awesome bracelets which are not only super easy to make but cost less than $1!!!:
Materials:
Satin Cord (2 or 3 different colors)
Lighter (to burn the ends of cord)
Bead (optional)
That's it!!!
I followed the Stitched Solomon Bar video tutorial (below) from Tying It All together's Youtube Channel. There are so many unique knot tutorials that I could make bracelets all day! You can also view all the knots on the Knot Gallery (clicking on the picture will lead you to a link for the video.)
For the base (pale green in top bracelet) you need double the length of your wrist + extra for knotting off the end or attaching the bead. For the knotting cord (dark green in top bracelet) I used approx. 40 inches, didn't actually measure (my wrist is 6inches in length). One thing to note is that the videos do not include the length of cord/rope needed so you will have to use trial and error.
To make the two toned look of the bottom bracelet use a knotting cord made of two different colored cords fused together (I used dark and light blue, and attached using some Instant Krazy Glue). Here's a close up:
A simple and unique friendship bracelet = LOVE. Can't wait to experiment with different cords/ropes and try different knots. More bracelet DIYs to come!
Loving DIY Friendship Bracelets Lately,
Amy
![]() |
| If you look closely you can see that they are also REVERSIBLE, bonus! |
Materials:
Satin Cord (2 or 3 different colors)
Lighter (to burn the ends of cord)
Bead (optional)
That's it!!!
I followed the Stitched Solomon Bar video tutorial (below) from Tying It All together's Youtube Channel. There are so many unique knot tutorials that I could make bracelets all day! You can also view all the knots on the Knot Gallery (clicking on the picture will lead you to a link for the video.)
For the base (pale green in top bracelet) you need double the length of your wrist + extra for knotting off the end or attaching the bead. For the knotting cord (dark green in top bracelet) I used approx. 40 inches, didn't actually measure (my wrist is 6inches in length). One thing to note is that the videos do not include the length of cord/rope needed so you will have to use trial and error.
To make the two toned look of the bottom bracelet use a knotting cord made of two different colored cords fused together (I used dark and light blue, and attached using some Instant Krazy Glue). Here's a close up:
A simple and unique friendship bracelet = LOVE. Can't wait to experiment with different cords/ropes and try different knots. More bracelet DIYs to come!
Loving DIY Friendship Bracelets Lately,
Amy
Subscribe to:
Posts (Atom)